In this post, I want to guide you through the process of deploying an Amazon Bedrock AgentCore agent using the following set of tools:
uv for package management
Strands Agents for agent functionality
ECR and a container image for packaging the agent
Terraform for infrastructure and deployment
Let's get started!
The final code is located in the dhrimov/demo-bedrock-agentcore-terraform repository.
Why container and terraform
Let me spend a bit of time explaining this tool choice real quick. In most of the official AWS AgentCore documentation, AWS heavily promotes the AgentCore CLI and AWS CDK for creating and managing agents. For many individuals and companies out there, this is an unusual stack, as they are used to source control and terraform for managing their infrastructure.
I went with a container and terraform instead, and here is why:
One way of working. I already manage my infrastructure with terraform and git, and this way the agent is just another piece of it, with no separate process to remember.
No extra tooling. There is no AgentCore CLI to install and keep up to date, on my machine or in a build pipeline.
Versions I pick myself. The python version, the dependencies, the base image, and the provider are all pinned by me, instead of whatever a CLI ships with on the day I run it.
Nothing applied on my behalf. The IAM policy, the container, and the runtime configuration are files I can read and review, not defaults I find out about later.
This setup is more work than the CLI, and that trade-off gets easier to justify the bigger the company is - control over versions, over the infrastructure, and over access control matters a lot more once many people share one account. You do more by hand with terraform, but you get more confidence in what ends up deployed.
AWS has a guide on the custom setup for AgentCore that I will be following here, but the deployment will happen with terraform instead of the AWS SDK (boto3 client) approach the guide proposes. I will also structure the agent files a little differently, making room for future improvements.
Prerequisites
Let's get the tools out of the way first. Nothing exotic here, but a few of them bite you later if they are missing:
An AWS account with credentials configured locally. Everything in this post runs in
eu-central-1, so if you work in a different region, be ready to swap it in the provider config, in the IAM policy, and in the commands that talk to ECR.Permissions to create what we build here: an ECR repository, an IAM role with an inline policy, and an AgentCore Runtime.
Model access in Bedrock. Our agent calls
global.amazon.nova-2-lite-v1:0, and Bedrock refuses the call until that model is enabled for your account. You can pick a different model inagent.pylater. Just make sure the one you pick is enabled and available where you run.uv for python package management. Both sub-projects target python 3.13, and uv fetches the interpreter for you if you do not have it.
Docker with buildx. AgentCore only runs arm64 images, and there is a whole section further down on what that means for your machine.
Terraform 1.10 or newer. The AWS provider has to be 6.x -
aws_bedrockagentcore_agent_runtimeis a recent addition, and older providers do not know the resource at all.AWS CLI. We only use it once, to log docker into ECR.
Everything we create here is real AWS infrastructure - ECR storage, an AgentCore Runtime, and the Bedrock calls the agent makes. Running through this post costs very little, but it is not free, so do not skip the teardown at the end.
Folder structure
Before we dive in, I want to share the folder structure of the final project, because this is what we are working towards in this post.
.
├── README.md
├── agent
│   ├── .dockerignore
│   ├── Dockerfile
│   ├── agent.py
│   ├── handler.py
│   ├── local.py
│   ├── models.py
│   ├── pyproject.toml
│   └── uv.lock
├── scripts
│   ├── invoke_agent.py
│   ├── pyproject.toml
│   └── uv.lock
└── terraform
    ├── agentcore-runtime.tf
    ├── aws.tf
    ├── ecr.tf
    ├── providers.tf
    ├── terraform.tf
    └── variables.tf
Three folders, three separate concerns:
agentis the place where all of the agent code lives. It is a self-contained uv project with its ownpyproject.tomlanduv.lock, and it doubles as the docker build context - theDockerfilesits right next to the code it packages, so the image never has to reach outside this folder.terraformis the folder where all of the IaC goes. I split it by concern instead of dropping everything into onemain.tf, so the ECR repository, the provider setup, and the runtime each have their own file.scriptsholds the engineering scripts, and it is a separate uv project again. The invocation script needsboto3, the agent does not, and I would rather keep those two dependency trees from ever meeting.
The root itself stays empty on purpose - only the README.md is committed there. Every folder brings its own dependencies and its own lock file, which keeps the container image lean and makes it obvious where a given piece of the project lives.
Setting up an agent
First, let's set up our agent functionality. This is going to be a very simple hello world agent, with no tools attached yet.
Dependencies
We start by creating an agent/pyproject.toml file with the following content:
[project]
name = "demo-bedrock-agentcore-terraform"
version = "0.1.0"
requires-python = ">=3.13"
dependencies = [
]

[dependency-groups]
dev = [
]
Once this is done, let's create a virtual environment. From the agent folder, run:
uv lock
uv sync
Next, let's add the dependencies the agent needs:
uv add fastapi 'uvicorn[standard]' pydantic httpx strands-agentsThat is five packages in one line, so let's walk through what each of them is doing here:
fastapi- the web framework that serves the two endpoints AgentCore expects from our container.uvicorn[standard]- the ASGI server that runs FastAPI. Thestandardextra adds the faster event loop and websocket support.pydantic- the request and response models we will write in a minute.httpx- an HTTP client. Nothing we write calls it directly, and Strands pulls it in anyway, but it comes with the AWS example. It is what you reach for once your agent starts calling other services.strands-agents- the agent framework itself.
Hello world agent
As noted earlier, I want to restructure the example in the AWS documentation to make it easier to extend later, so let's start by moving the models out to agent/models.py:
from typing import Dict, Any

from pydantic import BaseModel


class InvocationRequest(BaseModel):
    input: Dict[str, Any]


class InvocationResponse(BaseModel):
    output: Dict[str, Any]
Next, let's move our agent out to agent/agent.py:
from strands import Agent
from strands.models import BedrockModel

bedrock_model = BedrockModel(
    model_id="global.amazon.nova-2-lite-v1:0",
)
strands_agent = Agent(model=bedrock_model)This does not look like much to move out on its own, but the agent itself will grow as you start adding more functionality like a memory manager, a conversation manager, a session manager and so on. This may even become a package, where the agent is created in the __init__.py file, and every piece of it comes from a separate file within the package. A structure like that makes it much easier to manage a bigger agent codebase.
Strands is what AWS reaches for in the AgentCore documentation, and it is the quickest way to get something running, but AgentCore does not require it. The runtime only asks for a container that answers POST /invocations and GET /ping on port 8080 - what produces those answers is up to you. LangGraph, CrewAI, or plain boto3 calls to the Bedrock Converse API with no framework at all would work just as well. This is another reason to keep the agent in its own file: swapping the framework is a change to agent.py, while handler.py, the Dockerfile, and every line of terraform in this post stay exactly as they are.
With the agent ready, let's implement our agent/handler.py, which creates the FastAPI interface:
from datetime import datetime, timezone

from fastapi import FastAPI, HTTPException

from agent import strands_agent
from models import InvocationResponse, InvocationRequest

app = FastAPI(title="Strands Agent Server", version="1.0.0")


@app.post("/invocations", response_model=InvocationResponse)
async def invoke_agent(request: InvocationRequest):
    try:
        user_message = request.input.get("prompt", "")
        if not user_message:
            raise HTTPException(
                status_code=400,
                detail="No prompt found in input. Please provide a 'prompt' key in the input."
            )

        result = strands_agent(user_message)

        response = {
            "message": result.message,
            "timestamp": datetime.now(tz=timezone.utc).isoformat()
        }

        return InvocationResponse(output=response)

    except Exception as e:
        raise HTTPException(status_code=500, detail=f"Agent processing failed: {str(e)}")


@app.get("/ping")
async def ping():
    return {"status": "healthy"}
Finally, let's add a small helper that runs the agent locally, so we can test what we have without containerizing it first. To do so, let's create a file called agent/local.py:
import uvicorn

from handler import app

if __name__ == "__main__":
    uvicorn.run(app, host="0.0.0.0", port=8080)
When everything is done, let's test what we have so far. First, we launch our FastAPI application from the agent folder:
uv run local.pyAnd then, once the FastAPI server is up and running, let's call it with curl:
curl -X POST http://localhost:8080/invocations \
  -H "Content-Type: application/json" \
  -d '{
    "input": {"prompt": "Hello!"}
  }'
You should see a JSON response from the agent with the assistant's message, token metrics, latency metrics and so on.
Why ARM64
You are about to see linux/arm64 show up in the Dockerfile and in every docker command from here on, so let's get the reason out of the way first.
AgentCore only accepts arm64 images. This is not optional - the AWS requirements state that the platform must be linux/arm64, and an x86 image is not going to run there.
What that means for you depends on the machine you build on:
On Apple Silicon you are already on arm64, so a normal build gives you the right architecture without any extra thought.
On an Intel or AMD machine a plain
docker buildgives you an amd64 image. To get arm64 you need buildx with emulation, which you set up once withdocker buildx create --use. Expect the build to take longer, since every layer runs under emulation.
This is also why the Dockerfile pins the platform on the FROM line and the build command passes --platform linux/arm64 on top of that. Either one alone is usually enough, but together they make it hard to end up with an amd64 image by accident. Docker will warn you about the constant platform in FROM - that warning is about the Dockerfile being tied to a single architecture, which is exactly what we are after.
Be aware that the wrong architecture does not fail where you would expect it to. The image builds, pushes to ECR, and terraform applies without a complaint. You find out later, when the runtime cannot start your container. So if a deployment that looked clean refuses to serve traffic, check the image architecture before you go digging anywhere else.
You can check what you actually built at any point:
docker image inspect --format '{{.Architecture}}' my-agent:arm64That should print arm64. If it prints amd64, the platform flag did not take effect.
Containerize the agent
Now that we can launch our agent locally, it is time to containerize it.
First, we tell docker what to keep out of the image with agent/.dockerignore:
.venv
__pycache__
.idea
Dockerfile
.dockerignore
local.py
The local.py line keeps the local run helper out of the image, since the container starts uvicorn directly.
Be mindful of the .venv line. We build the virtual environment inside the image, and your local .venv was built for your machine, so copying it in would overwrite a working Linux environment with one that cannot run there. Without this line the image still builds fine, and fails only when you try to run it.
Now let's create the container definition in agent/Dockerfile:
# Use uv's ARM64 Python base image
FROM --platform=linux/arm64 ghcr.io/astral-sh/uv:python3.13-bookworm-slim

WORKDIR /app

# Copy uv files
COPY pyproject.toml uv.lock ./

# Install dependencies
RUN uv sync --frozen --no-cache

# Copy the agent code - .dockerignore decides what stays out
COPY . ./

# Expose a port
EXPOSE 8080

# Run the application
CMD ["uv", "run", "uvicorn", "handler:app", "--host", "0.0.0.0", "--port", "8080"]
Then we build the container image from the agent folder:
docker buildx build --platform linux/arm64 -t my-agent:arm64 --load .And finally, let's launch the agent inside the container. To do so, you need to pass the AWS environment variables, because Strands requires AWS credentials:
docker run --platform linux/arm64 -p 8080:8080 \
  -e AWS_ACCESS_KEY_ID="$AWS_ACCESS_KEY_ID" \
  -e AWS_SECRET_ACCESS_KEY="$AWS_SECRET_ACCESS_KEY" \
  -e AWS_SESSION_TOKEN="$AWS_SESSION_TOKEN" \
  -e AWS_REGION="$AWS_REGION" \
  my-agent:arm64
The containerized agent can be tested with the same curl command we used earlier:
curl -X POST http://localhost:8080/invocations \
  -H "Content-Type: application/json" \
  -d '{
    "input": {"prompt": "Hello!"}
  }'
Create an AWS ECR repository
As the next step, we need to create a repository in AWS ECR (Elastic Container Registry), and then build and push our agent container there, so that we can link to this container from the AgentCore Runtime infrastructure.
For terraform to work, we first pin the terraform and provider versions (terraform/terraform.tf):
terraform {
  required_providers {
    aws = {
      source  = "hashicorp/aws"
      version = "~> 6.5"
    }
  }

  required_version = ">= 1.10"
}
And then configure the AWS provider (terraform/providers.tf):
provider "aws" {
  region = "eu-central-1"
}This is the bare minimum, and it uses local terraform state. It is fine for a demo or single-person use, but it is not a production-ready config.
Once the terraform basics are in place, run this from the terraform folder:
terraform initNext, let's create the ECR repository (terraform/ecr.tf):
resource "aws_ecr_repository" "test_agentcore_repository" {
  name                 = "test-agentcore"
  image_tag_mutability = "IMMUTABLE"
  force_delete         = true
}I made the image tags immutable, to make sure that the images we push stay unchanged over time. This adds predictability and helps me avoid unexpected changes, like updating an image that is currently in use.
I also set force_delete here, so that a terraform destroy can remove the repository together with the images we push into it. Without it terraform refuses to delete a repository that still holds images, and the teardown at the end of this post fails. This is a demo setup - for anything you care about, leave force_delete off, so that a stray destroy cannot take your images with it.
Now we are ready to create the ECR repository. Let's run a plan, and then apply:
terraform plan
terraform applyWe are applying twice in this post on purpose. The ECR repository has to exist before we can push an image into it, and the AgentCore Runtime we write later points at a specific image tag, so it cannot be created until that image is actually in the registry. The order is: create the repository, push the image, then create the runtime.
Be aware of this ordering if you clone the finished repository instead of building the files up as we go. All of the terraform is there already, so a single terraform apply tries to create the runtime before any image exists, and it fails. Create the repository on its own first:
terraform apply -target=aws_ecr_repository.test_agentcore_repositoryThen push the image as described below, and run a full terraform apply after that.
Pushing the agent container to AWS
Once the ECR repository is created, we can build and push our agent image there. First, we authenticate docker so that it can push the image to ECR:
aws ecr get-login-password --region eu-central-1 | \
  docker login --username AWS --password-stdin <account-id>.dkr.ecr.eu-central-1.amazonaws.com
Once authenticated, we can build and push the docker image. We are back in the agent folder for this one, since that is where the Dockerfile and the build context live:
docker buildx build \
  --platform linux/arm64 \
  -t <account-id>.dkr.ecr.eu-central-1.amazonaws.com/test-agentcore:<version> \
  --push \
.Make sure to replace <account-id> with your own account id, and to specify the version of the image you are pushing. You can start with 0.0.1.
Setting up AgentCore infrastructure
With the image pushed, we can set up the agent. First, let's make sure that the deployment version is easy to find and change by keeping it in a terraform variable (terraform/variables.tf):
variable "image_tag" {
  description = "Image tag to deploy to AgentCore. Update and re-apply to redeploy."
  type        = string
  default     = "0.0.1"
}
The IAM policy we are about to write needs to scope permissions down to your own account, so let's look up the account id once and keep it in a local (terraform/aws.tf):
data "aws_caller_identity" "current" {}

locals {
  account_id = data.aws_caller_identity.current.account_id
}
And now, let's wire up a simple AgentCore Runtime (terraform/agentcore-runtime.tf):
data "aws_iam_policy_document" "assume_role" {
  statement {
    effect  = "Allow"
    actions = ["sts:AssumeRole"]
    principals {
      type        = "Service"
      identifiers = ["bedrock-agentcore.amazonaws.com"]
    }
  }
}

data "aws_iam_policy_document" "agent_runtime_permissions" {
  statement {
    actions   = ["ecr:GetAuthorizationToken"]
    effect    = "Allow"
    resources = ["*"]
  }

  statement {
    actions = [
      "ecr:BatchGetImage",
      "ecr:GetDownloadUrlForLayer"
    ]
    effect    = "Allow"
    resources = [aws_ecr_repository.test_agentcore_repository.arn]
  }

  statement {
    actions = [
      "logs:DescribeLogStreams",
      "logs:CreateLogGroup"
    ]
    effect = "Allow"
    resources = [
      "arn:aws:logs:eu-central-1:${local.account_id}:log-group:/aws/bedrock-agentcore/runtimes/*"
    ]
  }

  statement {
    actions = [
      "logs:PutResourcePolicy"
    ]
    effect = "Allow"
    resources = [
      "arn:aws:logs:eu-central-1:${local.account_id}:log-group:/aws/bedrock-agentcore/runtimes/test_agentcore_runtime-*"
    ]
  }

  statement {
    actions = [
      "logs:DescribeLogGroups"
    ]
    effect = "Allow"
    resources = [
      "arn:aws:logs:eu-central-1:${local.account_id}:log-group:*"
    ]
  }

  statement {
    actions = [
      "logs:CreateLogStream",
      "logs:PutLogEvents"
    ]
    effect = "Allow"
    resources = [
      "arn:aws:logs:eu-central-1:${local.account_id}:log-group:/aws/bedrock-agentcore/runtimes/*:log-stream:*"
    ]
  }

  statement {
    actions = [
      "cloudwatch:PutMetricData"
    ]
    effect = "Allow"
    resources = [
      "*"
    ]
    condition {
      test     = "StringEquals"
      values   = ["bedrock-agentcore"]
      variable = "cloudwatch:namespace"
    }
  }

  statement {
    actions = [
      "bedrock-agentcore:GetWorkloadAccessToken",
      "bedrock-agentcore:GetWorkloadAccessTokenForJWT",
      "bedrock-agentcore:GetWorkloadAccessTokenForUserId"
    ]
    effect = "Allow"
    resources = [
      "arn:aws:bedrock-agentcore:eu-central-1:${local.account_id}:workload-identity-directory/default",
      "arn:aws:bedrock-agentcore:eu-central-1:${local.account_id}:workload-identity-directory/default/workload-identity/test_agentcore_runtime-*"
    ]
  }

  statement {
    actions = [
      "bedrock:InvokeModel",
      "bedrock:InvokeModelWithResponseStream"
    ]
    effect = "Allow"
    resources = [
      "arn:aws:bedrock:*::foundation-model/*",
      "arn:aws:bedrock:eu-central-1:${local.account_id}:*"
    ]
  }
}

resource "aws_iam_role" "test_agentcore" {
  name               = "bedrock-agentcore-runtime-role"
  assume_role_policy = data.aws_iam_policy_document.assume_role.json
}

resource "aws_iam_role_policy" "test_agentcore" {
  role   = aws_iam_role.test_agentcore.id
  policy = data.aws_iam_policy_document.agent_runtime_permissions.json
}

resource "aws_bedrockagentcore_agent_runtime" "test_agentcore" {
  agent_runtime_name = "test_agentcore_runtime"
  role_arn           = aws_iam_role.test_agentcore.arn

  agent_runtime_artifact {
    container_configuration {
      container_uri = "${aws_ecr_repository.test_agentcore_repository.repository_url}:${var.image_tag}"
    }
  }

  lifecycle_configuration {
    idle_runtime_session_timeout = 60  # 1 minute
    max_lifetime                 = 300  # 5 minutes
  }

  network_configuration {
    network_mode = "PUBLIC"
  }
}
That is a lot at once, so let's walk through it.
The assume_role document is the trust policy. It lets the bedrock-agentcore service assume this role, which is how AgentCore gets permission to run our container on our behalf.
The agent_runtime_permissions document defines what the role can do once it has been assumed. The statements in there fall into four groups:
Pulling the image.
ecr:GetAuthorizationTokenhas to sit on*, because that call is not tied to any single repository. The two calls that read the image itself are scoped down to our repository only.Writing logs. Creating the log group and the streams under
/aws/bedrock-agentcore/runtimes/, and putting events into them.logs:DescribeLogGroupsis the odd one that needs a wider resource, since listing groups is not scoped to one group.Publishing metrics.
cloudwatch:PutMetricDataalso needs*, so we narrow it with a condition that allows thebedrock-agentcorenamespace and nothing else.Identity and model access. The
GetWorkloadAccessTokencalls are how the runtime identifies our workload, andbedrock:InvokeModelis what actually lets the agent reach the model we picked back inagent.py.
The two resources after that are plumbing - aws_iam_role attaches the trust policy, and aws_iam_role_policy attaches the permissions as an inline policy.
Then comes the runtime itself. Let's walk through the fields we pass in:
agent_runtime_name- the name you will see in the console. AWS appends its own suffix to build the runtime id, which is why the ARN we copy later reads something liketest_agentcore_runtime-m01JKpDgvjand not the plain name. That suffix is also why the log and workload ARNs in the policy above end with a wildcard.role_arn- the role we just built, so the runtime pulls the image, writes its logs, and calls the model as that role.container_uri- the image to run, assembled from the repository URL and ourimage_tagvariable. This is the line that turns a redeploy into a one-variable change.lifecycle_configuration- how long a session is allowed to sit idle, and how long it may live in total, before AgentCore tears it down.network_configuration-PUBLICis the simple option and needs no VPC wiring, which is what we want for a demo. It describes how the runtime reaches the network, not who can reach the runtime - invoking the agent needs IAM credentials either way. If your agent has to reach private resources, this is where you would put it into your own VPC instead.
I use lifecycle_configuration to keep the timeouts much smaller in this demo project, which keeps the cost down.
I also updated the IAM policy according to the AWS guide on AgentCore Runtime Permissions, because the policies in the other AWS docs do not grant enough permissions for the agent to operate.
Now, back in the terraform folder, let's plan and apply:
terraform plan
terraform apply
Testing the AgentCore agent
Console testing
You can test the deployed agent with the AWS console, which is a good first pass. To make sure everything works, navigate to the deployed AgentCore Runtime.
Step 1: open the AWS console, sign in, and then type agentcore in the search bar:

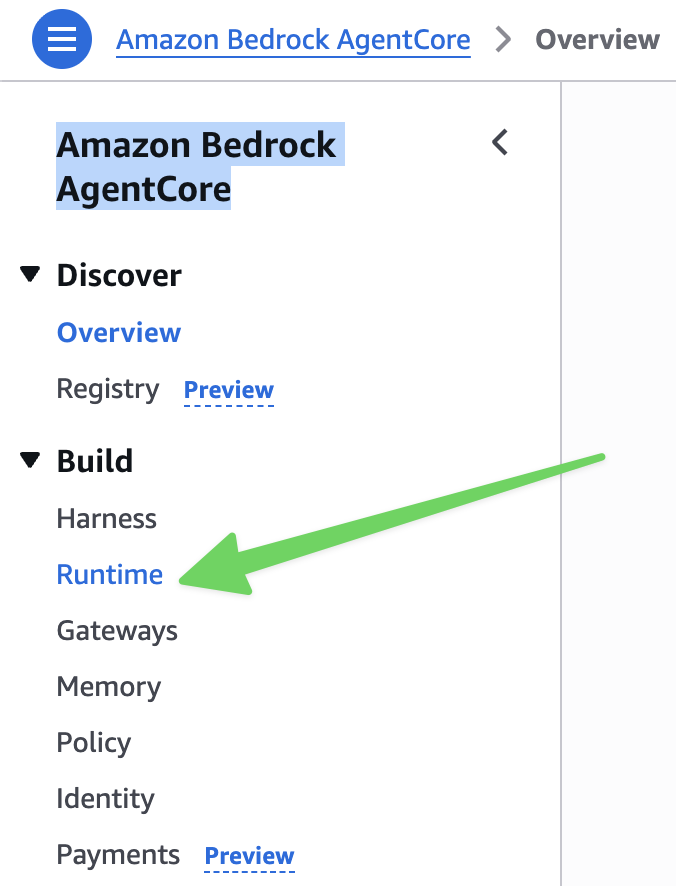
Step 2: navigate to the Runtime tab using the menu on the left:
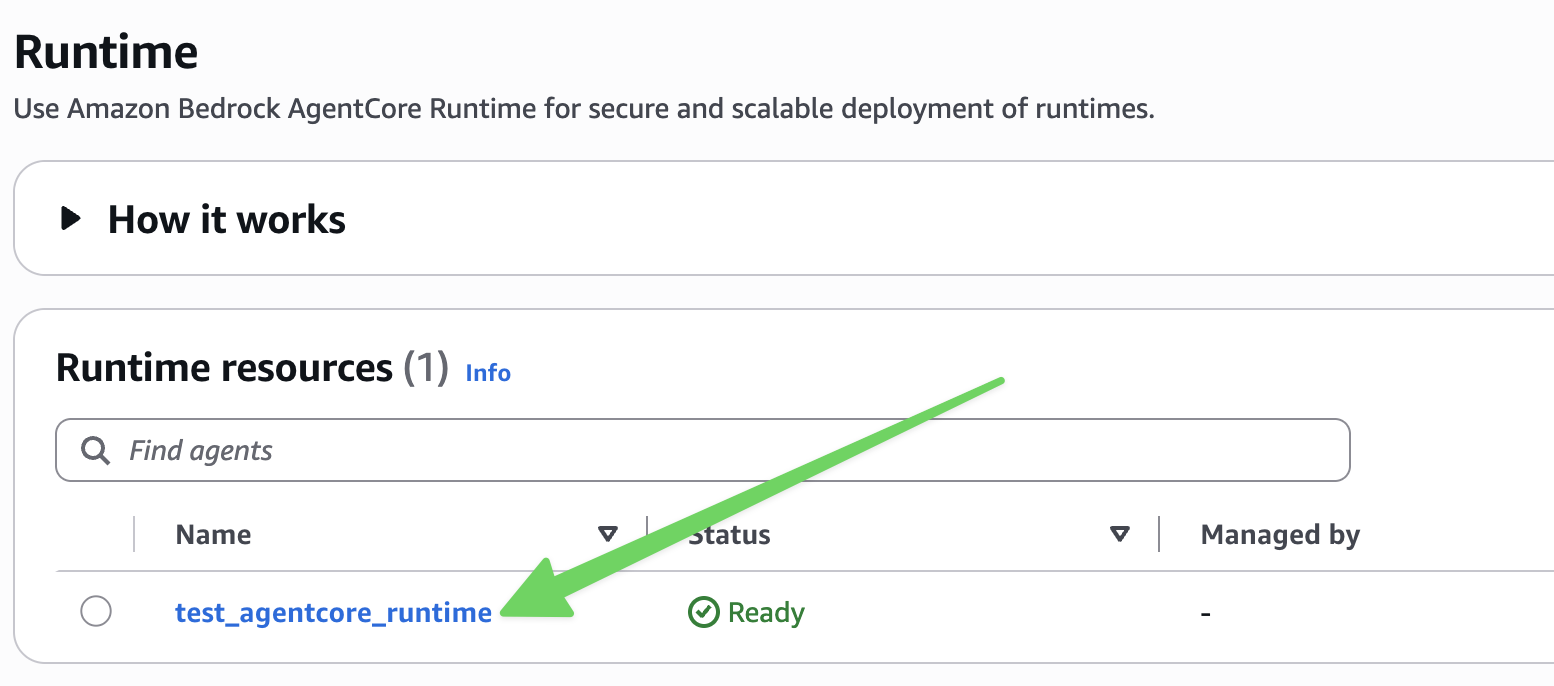
Step 3: you should see your deployed AgentCore Runtime. Open it:
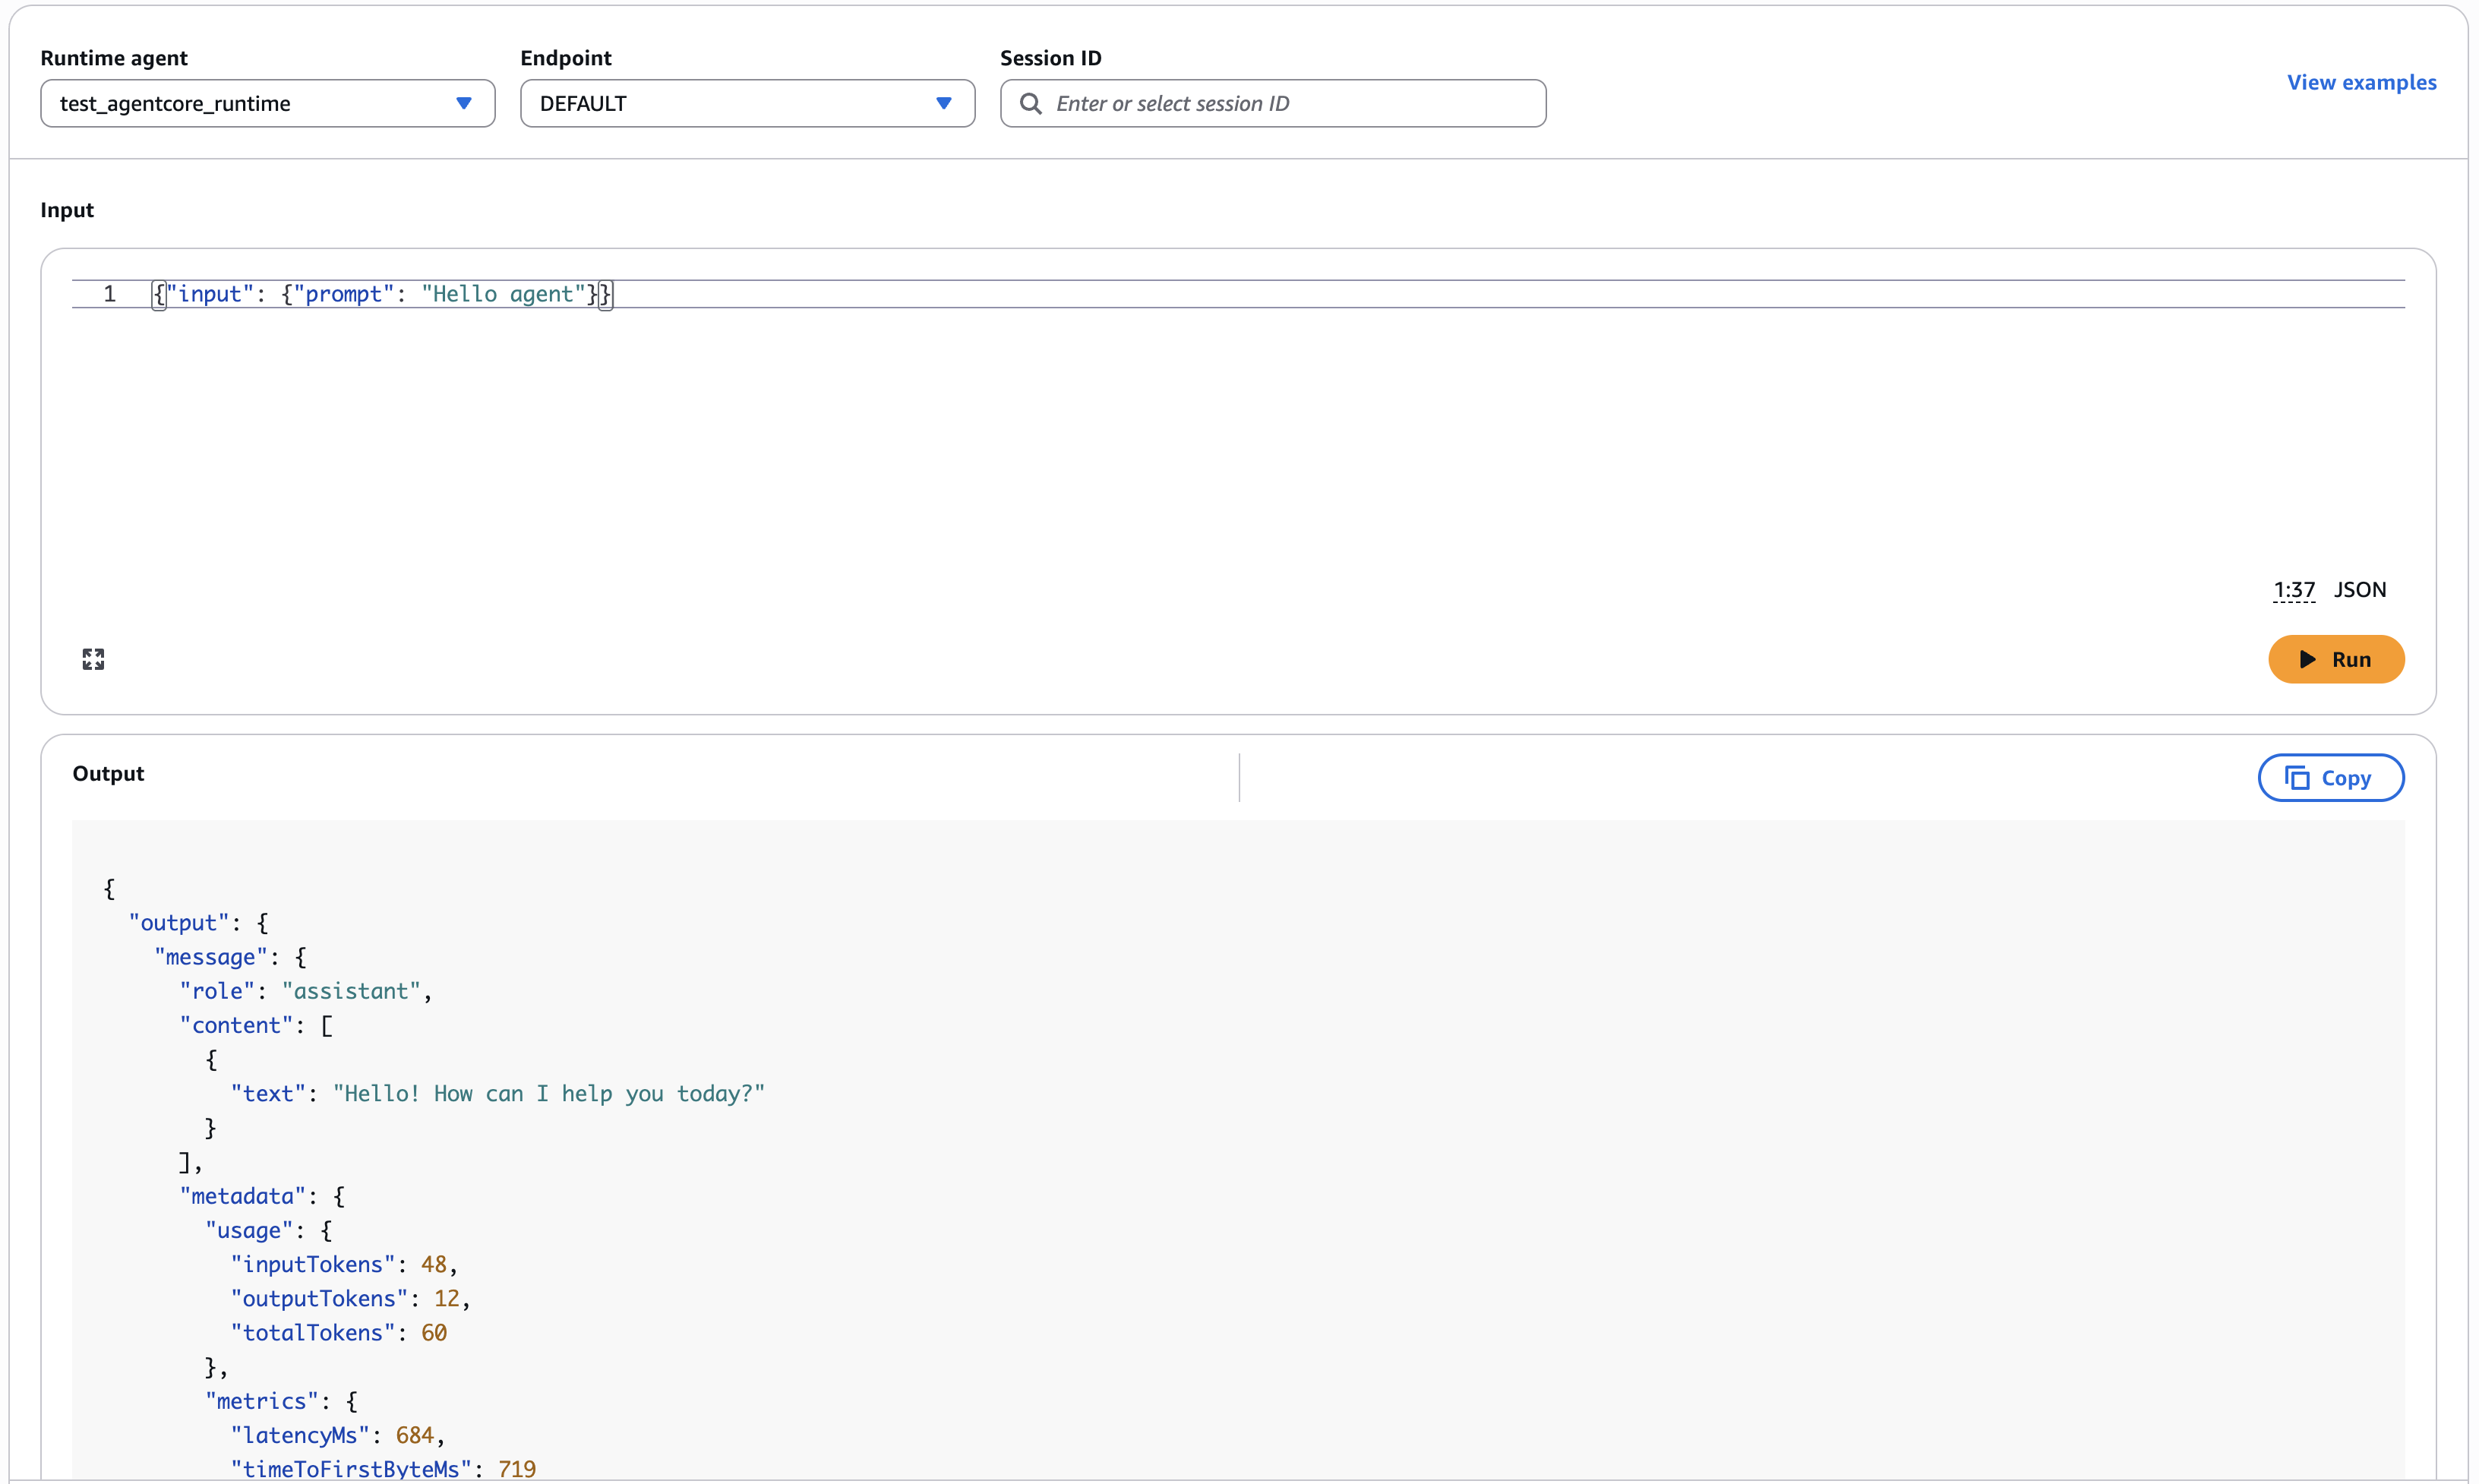
Step 4: under the Endpoints section, you should see the DEFAULT endpoint created. Make sure to select it and click Test endpoint:

Step 5: in the Input field, type:
{"input": {"prompt": "Hello agent"}}And then click the Run button. You should see the output:
Initializing a scripts sub-project
Next, let's set up a script that lets us invoke our agent programmatically with the boto3 AgentCore client. We do this by creating a scripts folder in the root of the project, and adding a pyproject.toml file to manage the dependencies of the scripts we use.
Script dependencies are different from the agent runtime dependencies, so I always try not to mix them together, and go with a separate sub-project for engineering scripts.
The scripts/pyproject.toml file looks like this:
[project]
name = "demo-bedrock-agentcore-terraform-scripts"
version = "0.1.0"
requires-python = ">=3.13"
dependencies = [
]

[dependency-groups]
dev = [
]
Next, let's initialize the project. From the scripts folder, run:
uv lock
uv sync
Now we can add our boto3 dependency:
uv add boto3Locating the AgentCore Runtime ARN
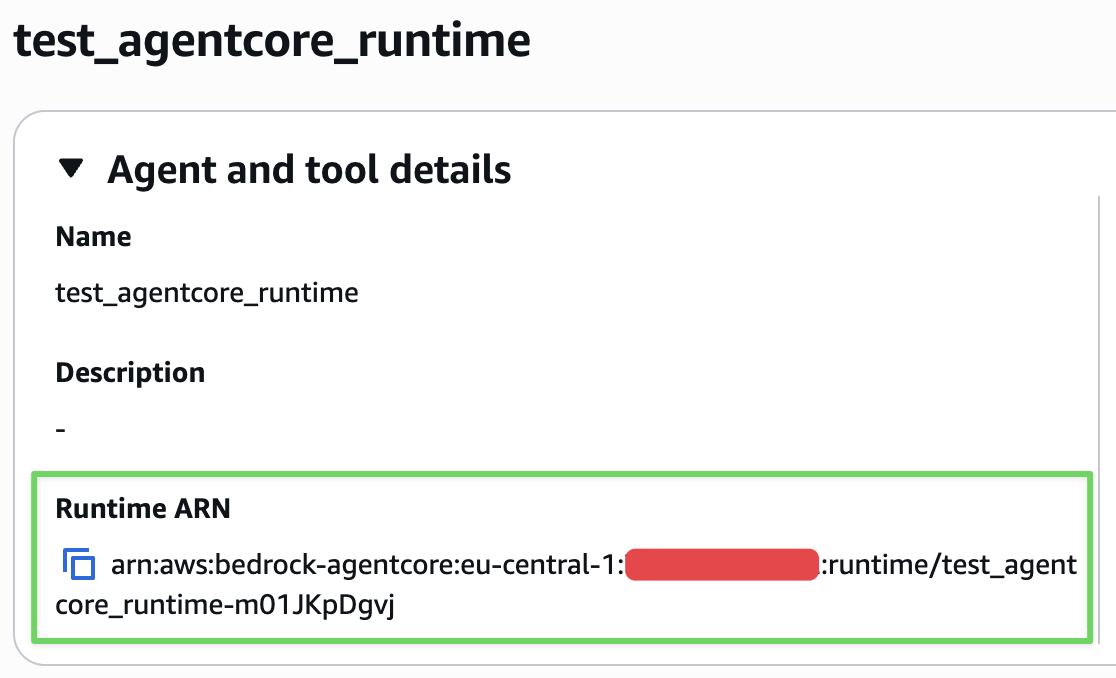
Now we need to find the deployed AgentCore Runtime ARN. Let's go back to the AgentCore Runtime (please see steps 1-3 under the Console testing section to navigate there).
Under the Agent and tool details section, you should see the ARN you need to copy:
Invocation script
We are now ready to invoke our agent, and the script to do it looks like this (scripts/invoke_agent.py):
import json
import uuid

import boto3

client = boto3.client('bedrock-agentcore', region_name='eu-central-1')

payload = json.dumps({"input": {"prompt": "Hello agent"}})

response = client.invoke_agent_runtime(
    agentRuntimeArn='arn:aws:bedrock-agentcore:eu-central-1:account-id:runtime/test_agentcore_runtime-m01JKpDgvj',
    runtimeSessionId=f'{str(uuid.uuid4())}',
    payload=payload,
    qualifier="DEFAULT",
    contentType="application/json",
)
response_body = response['response'].read()
response_data = json.loads(response_body)
print("Agent Response:", response_data)The runtimeSessionId value should be 33 or more characters. A UUID in its string form is 36 characters, so a single one is enough.
Make sure to add contentType="application/json" - otherwise you may see 422 errors that are pretty hard to debug.
Now, from the scripts folder, let's run this script:
uv run invoke_agent.pyAnd you should see a JSON response similar to what you got in the console.
Redeploying a change
Once the runtime is up, shipping a change to the agent is the same three moves every time. Say you edited agent.py and want 0.0.2 out there.
Build and push the new tag from the agent folder:
docker build \
  --platform linux/arm64 \
  -t <account-id>.dkr.ecr.eu-central-1.amazonaws.com/test-agentcore:0.0.2 \
  --push \
  .
Then point the variable at it and apply from the terraform folder:
terraform apply -var 'image_tag=0.0.2'Or bump the default in variables.tf instead, if you would rather have the deployed version committed than passed on the command line.
The tag has to be a new one. We set image_tag_mutability = "IMMUTABLE" on the repository, so pushing 0.0.1 a second time is rejected. That is the point of the setting - the tag the runtime points at cannot change underneath it - but it does mean every deploy needs a version bump.
Destroying the resources
To avoid any unexpected charges, make sure to destroy the infrastructure created in this guide by running the terraform destroy command in the terraform folder.
Final words
That is the whole loop - a Strands agent you can run and curl locally, the same code packaged into an arm64 container, an ECR repository to hold it, and an AgentCore Runtime that serves it. All of it lives in git, all of it comes up with terraform apply, and a redeploy is one variable and one image push.
It is more work than the AgentCore CLI, and I want to be honest about that. You write the Dockerfile yourself, you write the IAM policy yourself, and you have to keep the ordering in mind between the repository, the image, and the runtime. What you get back is a deployment you can read end to end, review in a pull request, and reproduce on any machine that has terraform - no extra tooling to install, and nothing between your code and the thing that runs it that you did not write.
From here, the interesting part is the agent itself. Right now agent.py barely does anything, and that is exactly where memory, session management, and your own tools go next. On the infrastructure side, the two things I would change before calling this anything more than a demo are remote terraform state and a private network_configuration if the agent has to reach resources inside your VPC.
Thank you so much for taking the time to read this. If you hit something I did not cover, or you solved a piece of this differently, please reach out - I would like to hear about it. Happy coding!